
This Tutorial was created in Jasc PSP9, but can be done in any version
Supplies needed:
3 Owl tubes (or tubes of your choice)
The ones I used are free from picsfordesigns.com,
but you still need a license to use them.
Hoot! Hoot! Wordart by me-TeriW
-------------------------------------
Plugins Needed:
AAA Filters~Good Vibrations
RCS Filter Pak 1.0~RCS ScreenWorks~Paisley
Filter Factory Gallery J~Twister
AP (Lines)~Lines-Satin
<Bkg Designer sf10 II>PatchWorks
ECWS~Tile Maker 1.0
----------------------------------
Preparation-
Open your tubes in PSP..Duplicate and Close Originals
Light color for the foreground-I used #b9e8d8
Dark color for the background-I used #489379
If you need to install any of the above Plugins, don't forget to
restart your PSP program for them to show up
----------------------------------
STEP 1-Change Your Foreground to a Gradient
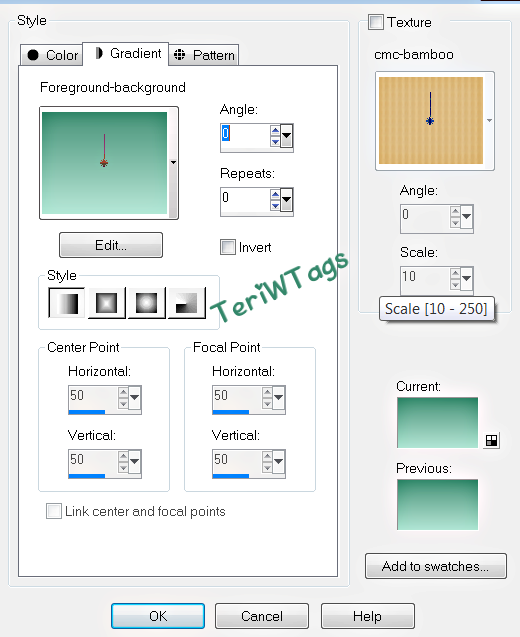
Linear, 0, 0
File~New
700 X 700
Flood Fill With Your Foreground Gradient
Effects~Reflection Effects~Pattern

STEP 2- Maximize one of the owl tubes ( or a tube of your choice)
Edit~Copy
Edit~Paste as New Layer
Image~Resize by 90%, All Layers-UNchecked
Layers~Properties
Opacity- 50%- Change Blend mode to-Luminance (Legacy)
STEP 3- Edit~Paste~Paste As New Layer (should still be cached)
Image~Resize by 45%, All Layers-UNchecked
Position tube to the lower left of the canvas.
Effects~3D Effects~Drop Shadow-

STEP 4- Open the 2nd owl tube (or tube of your choice)
Edit~Copy, Close Original
Edit~Paste as New Layer
Image~Resize by 45%, All Layers-UNchecked
Position tube down beside the first tube,see my example above
Effects~3D Effects~Drop Shadow-same as in Step 3
STEP 5- Open the 3rd Owl Tube (or tube of your choice
Edit~Copy, Close Original
Edit~Paste as New Layer
Image~Resize by 25%, All Layers-UNchecked
Position tube on the right bottom side of canvas, see my example above
Effects~3D Effects~Drop Shadow-same as in Step 3
Layers~Merge~Merge All (flatten)
STEP 6- Image~Add Border 5, background color (I used #489379)

Change Your Gradient to Color #b9e8d8
STEP 7- Image~Add Border

Use Your Magic Wand On The Border-
STEP 8- Effects~AAA Filters~Good Vibrations

STEP 9- Change Your Background Color to #489379
Image~Add Border

background color, 0,15,0,0
STEP 10- Change your background color to #0048b2 (or your choice of color)
Use Your Magic Wand on the Border (same settings in step 7 )
Effects~RCS Filter Pak 1.0~RCS ScreenWorks-Paisley
No settings given
Selections~Select None
STEP 11- Change Your Background Color to #9403a8
Image~Add Border

Background color, 0,0,0,15
STEP 12- Use Your Magic Wand on the Border (same settings as in Step 7)
Effects~Filter Factory Gallery J~Twister

140
Selections~Select None
STEP 13- Change Your Background Color to #b30e40
Image~Add Border

background color, 0,0,15,0
Use Your Magic Wand on the Border -same settings as in Step 7
STEP 14- Effects~AP (Lines)~Lines-Satin

4,100,179,190,109,10,10,89,104,104,104
Selections~Select None
STEP 15- Change you background color to #489379
Image~Add Border 5, Background color, Symmetric= Checked
Selections~Select all
Image~Add border,
foreground color, 35
Selections~Invert
STEP 16- Effects~Filters Unlimited 2<Bkg Designer sf10 II>~PatchWork
(yours may be as a stand-alone)

Selections~Select None
STEP 17- Image~Add Border 5, Background color
Selections~Select All
Image~Add Border 35, Foreground Color
Selections~Invert
Effects~ECWS~Tile Maker 1.0

50
Selections~Select None
Image~Add Border 5, background color
STEP 19- Open Hoot Hoot Wordart
Edit~Copy, Close Original
Edit~Paste~Paste As New Layer
Position Wordart to your liking, see my example above
Effects~3D Effects~Drop Shadow
Same settings as in Step
STEP 20- Layers~New Raster Layer
Add your text and copyrights
Layers~Merge~Merge All Flatten
Image~Resize~60%, All Layers Checked
STEP 21- Adjust~Sharpness~Unsharp Mask
10, 15, 5
Export as JPEG Optimizer and save to your designated folder.
Thank you for doing my Tutorial.
And a Special Thank you to those that tested my Tut-
MaryD
Janis
Sammy
Jani
You want to be my Tut Tester?
My Group-
PSP-Let's Have Fun-