

Created in Jasc PSP9, but can be done in any verion with a few minor adjustments.
Supplies Needed-
A Tube
(mine is a PTU tube from picsfordesign.com and you need a license to use it.)
Plugins Used-
I.C.Net Software~Filters Unlimited 2~Noise Filter~
Effects~VanderLee~Unplugged X~Lasarrays
Open your tube
Duplicate & Close Original
Pick a light color and a dark color from your tube
Step 1-
File~New, 700 x 700
Change foreground color to Gradient

30, 2, Rectangular, 50, 50, 50, 50
Floodfill the canvas with your gradient
I.C.Net Software~Filters Unlimited 2~Noise Filter~X-Noise

78
Step 2-
Effects~VanderLee~Unplugged X~Lasarrays

0, 25, 0, Lasarrays
Step 3-
Effects~Image Effects~Seamless Tiling

Corner, Bidirectional, 0, 0, 50, Linear Checked
Selections~Select All
Selections~Modify~Contract by 20
Step 4-
Selections~Invert
Layers~New Raster Layer
Floodfill with the foreground Gradient, same as in Step 1
Selections~Select None
Step 5-
Maximize your Tube
Edit~Copy, Close Original
Edit~Paste~Paste As New Layer
Effects~3D Effects~Drop Shadow

3, 3, 100, 5, Black
Repeat Drop Shadow, changing the V & H to -3 (minus)
Step 6-
Layers~Merge~Merge All (Flatten)
Image~Add Borders ~4, foreground color

Step 7-
Image~Add Borders~25, foreground color

With the Magic Wand Tool-
Add (Shift)~RGB Value, Contiguous and Ant-alias both Checked
Select inside the 25 border
Step 8-
Effects~Distortion Effects~Curlycues

10, 10, Symmetric Checked, 100, 100
Selections~Select None
Step 9-
Image~Add Border 4, Background color
Effects~Geometric Effects~Perspective Horizontal~

-40 (minus), Color, background color
With the Magic Wand, same settings as in Step 7
Click inside the top solid background space
(Top and Bottom solid background should have marching ants around it.)

Step 10-
Effects~VanderLee~Unplugged X~Laserrays
(watch your numbers closely)
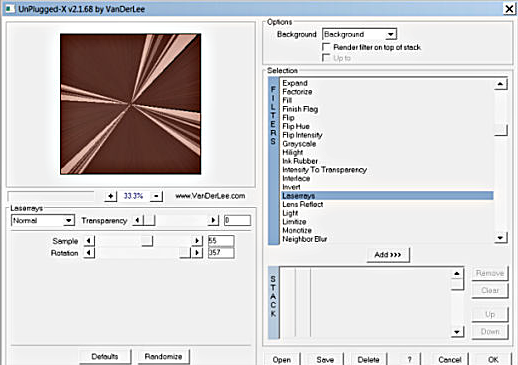
Normal, 0, 55, 357, Background
Selection~Select None
Step 11-
Image~Add Borders 4, background color (same as in step 4)
Image~Add Borders 4, foreground color (same as in Step 6)
Image~Add Borders 4, background color (As above)
Step 12-
Layers~New Raster Layer
Add your copyrights and text
Layers~Merge~Merge All (Flatten)
Save As jpg to your designated folder.
And a special Thank you to those that tested my Tut:
Sharon
Ernie
Marianne
Jani
Sammy
MaryD