Translate

Sunday, May 27, 2018

GARDEN


Tutorial was created in JASC PSP9, but can work in any version, with a few minor changes.

Supplies-you can get here-


Plugins Used-
Filters Unlimited2-Special Effects-Aged Film

Foreground Color-I used #e5e8b9
Background color- I used  #b2684d

------------------------------------------------
Step 1-  Open the tubes in PSP, minimize for now.
File/New, 700 x 700, Transparent Checked
Change Foreground color to Gradient..Settings as shown below--

   45, 5, Linear, Invert-UNchecked

Step 2- Floodfill with your Gradient 
Change your foreground back to color (#e5e8b9)
Layers/New Raster Layer
Floodfill with the foreground color

Step 3- Maximize tw_001
Edit/Copy
Back on your working canvas
Selections/Select All
Edit/Paste/Paste Into Selection
Selections/Select None
Set the Blend Mode to Luminance (Legacy)

Step 4-  
Filters Unlimited2/Special Effects1/Aged Film with the settings shown below-

  21, 36, 175

In the Layers palette lower the Opacity to 75

Step 5-  Open tw_83
Edit/Copy,  Close Original
Edit/Paste/Paste As New Layer
Image/Resize//75, Resample=Smart Size
Move to the bottom right side of canvas.
See my example above.

Step 6- Effects/3D Effects/Drop Shadow using the settings shown below-

 4, 4, 50, 5, Black

Step 7- Open TW_oo5_38
Edit/Copy, Close Original
Edit/Paste/Paste As New Layer
Image/Resize/75%, two times Resample-Smart Size
Move to bottom left of canvas

Step8- Apply Drop Shadow-same settings as in Step 6
Layers/Merge/Merge All Flatten
Filter's Unlimited 2/Special Effects1/Aged Film-same settings as used in Step 4.

Step 9-Image/Add Borders/10, backgound color (#b2684d)
Image/Add Border/10, foreground color (#e5e8b9)
Image/Add Borders/25, backgound color (#b2684d)

With the Magic Wand click on the 25 border-using the settings shown below--


Add (Shift),  RGB Value, Tolerance & Feather-0, 
Continguous And Anti-Alias= Both Checked, Outside

Step 10- Effects/Reflection Effects/Kaleidoscope/, using the settings shown below

0, 0, 0, 0, Reflect, 8, 0, 0

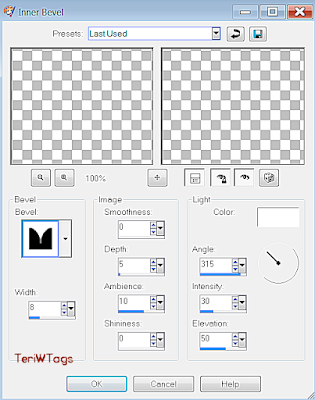
Step 11- Effects/3D Effects/Inner Bevel, using the settings as shown below-

8, 8, 0, 5, 10, 0, White, 315, 30, 50
Selections/Select None

Step 12- Layers/Duplicate
Image/Resize/85%,
Effects/3D Effects/Drop Shadow, using the same settings as in Step 6.
Layers/Merge/Merge All Flatten
Adjust/Sharpness/Unsharp Mask, with these settings-
5, 10, 5

Step 13- Image/Resize/65%, All Layers=Checked
Layer/New Raster Layer
Add your copyrights and text
Layers/Merge/Merge All Flatten
Export using JPEG Optimizer and save to your designated folder.

Thank you for doing my Tutorial and a Special Thank you for Testing it to-
Sammy
Jani
MaryD
Janis


Another Example by Sammy


And By Elaine


Thursday, May 24, 2018

A TRANQUILITY MOMENT


This Tut was created in JASC PSP9.

Supplies Needed-
A Tube
Deco1- Get Here

I'm using the PTU Artwork of The Vintage Angel, you need a license # to use it
and you can purchase it at CDO here

No Outside Filters Used
------------------------------
Foreground color= I used #d4e7ec
Background color= I used #4d678c


Step 1- File/New Image 950 by 575, White
Change background color to Gradient using these settings-
0,5, Radial, H & V= 50
Layer/New Raster Layer
Floodfill with your background Gradient
Adjust/Blur/Gaussian Blur- 20

Step 2-
Change your background Gradient back to color 
Layer/New Raster Layer
Floodfill with Background color (#4d678c)
Change the Opacity to 75%


Step 3- Open deco1
I recolored mine 
Ajust/Hue and Satuation/Colorize/
Hue= 135, Saturation= 132
Edit/Copy/Paste As New Layer, Close Original
With the Move Tool, position the deco1 to the top left of the canvas
See my tag for example above

Step 4-Layers/Duplicate
Image/Mirror
Layers/Merge/Merge Down
Layers/Duplicate
Image/Flip
Layers/Merge/Merge Down

Step 5- Open CDO-7-3-The Vintage Angel_Tranquility
Edit/Copy-Minimize the tube
Back on your working canvas, highlight Raster 1 (one layer up from the Background Layer)
Selections/Select All

Step 6- Layers/New Raster Layer
Edit/Paste/Paste Into Selection
Selections/Select None
Image/Mirror
In the materials palette change the Blend Mode to Luminance (Legacy) and
Opacity to 75%
Layers/Merge/Merge Visible

Step 7- Edit/Paste/Paste as New Layer 
Image/Resixe by 135%-All Layers-UNchecked
With the Move Tool, position to the right bottom side of canvas
Effects/3D Effects/Drop Shadow with these settings-
V & H= 4, Opacity- 50, Blur= 5, Black

Step 8- 
Image/Add Borders/3,Foreground Color (#d4e7ec0)
Image/Add Borders/3,Background Color (#4d678c)
Image/Add Borders/30, Foreground color (#d4e7ec0)

Step 9- Click on the 30 border with the Magic Wand
Add (shift)-RGB Value, Tolerence and Feather-0
Contiguous and Anti-Alias-Both Checked
Effects/Reflections Effects/Pattern with these settings-
-3, -76, 35, -9, 3, 15,35, -10

Step 10- Effects/3DEffects/Inner Bevel with these settings-
Bevel=7, 8, 0, 5, 10, 0, White, 315, 30, 50
Selections/Select None
Image/Add Borders/3, Background Color (#4d678c)

Step 11- 
Layers/New Raster Layer
add your text and copyrights
Layers/Merge/Merge All (Flatten)
Image/Resize by 75%, Two Times
Adjust/Sharpen/Unsharp Mask-
5, 10, 5

Export as JPEG Optimizer and save to your designated folder.

Thank you for doing my Tutorial and a Special thanks for testing it to-
MaryD
Jani
Janis
Sammy


Thursday, May 17, 2018

BEE HAPPY!


Supplies Needed:

Floral Tube
Bee Tube
Supplies Here-
https://app.box.com/s/6rptzzcik6oado0x8j02bpup8dfkc5ft


Plugins Used:

Video Rave-Crochet Art

VM Toolbox-Radial Mosaic

I.C.Net Software Filters Unlimited~&Bkg Designer sf10 11- Daggers Done

Backgroundmaniac- Fantasy Grid


Step 1-Open your tubes

Duplicate and close original

Pick a light color and a dark color from your image

Colors I used- Foreground= #ffffff  Barkground= #2e4711

Change your foreground color to a gradient using these settings-
Linear, 100, 0

Step 2- File~New
710 X 510
Floodfill with your foreground gradient

Step 3-
Effects-Plugins-Video Rave-Crochet Art using these settings
65, 105, 71, 116, 116

Step 4-
Effects/Plugins/VM Toolbox-Radial Mosiac using these settings-
Angle-54, Radius= 77, Adjust= 127


Step 5-
 Maximize Floral.png
Edit-Copy, Close Original
Edit~Paste as a new layer
Resize at 80%, Resample Using Smart Size, Lock Aspect Ratio- Checked
Resize All Layers UNchecked
Move to the left (see my example above)
Add a drop shadow using these settings-
4, 4, 100, 5, Black

Step 6- Maximize Bee.png
Image-Mirror
Edit-Copy-Close Original
Edit-Paste as a new layer
Resize at 70%, Resample Using Smart Size, Lock Aspect Ratio- Checked
Add a Drop Shadow, using the same settings as in Step 5
Move to the right (see my example above)

Step 7-Image-Add border 7 background color (#2e4711)
Change foreground to ##c6d2b2
Image-Add border 7 foreground color (#c6d2b2)
Image-Add border 20 background color (#2e4711)

Step 8-Selections-Select All
Selections~Modify-Contract by 27%
Selections-Invert

Step 9- Effects-3D Effects-Outer Bevel- using the settings below-
Bevel-8,25,10,20,30,35,background color,315,75,30
Selections-Select None

Step 10- Image-Add Border 35, foreground color
Use your Magic Wand on the 35 border
Add (shift), RGB Value, Tolerence-0, Contingious-Checked, Feather-0, Anti-Alias-Checked-Outside
Effects-I.C.Net Software Filters Unlimited-&Bkg Designer sf10 11-Daggers Done
196, 76
Selections~Select None

Step 11- Image/Add Borders 7, background color
Image/Add Borders 7, foreground color
Image/Add Borders 25, background color


Step 12-Use your Magic Wand on the 25 border- same settings as in Step 10
Effects-Plugins-Backgroundmaniac-Fantasy Grid, with these settings-
216, 177, 161, 92
Selections-Select None

Step 13- Image-Add border 3, foreground color  (#2e4711)
Image/Add Border 3. background color
Image~Resize 70%, All Layers-Checked Resample using-Smart Size,
Lock aspect ratio and Resize All-both Checked
Adjust/Sharpness/Unsharp Mask with these settings. 5, 10, 5

Step 14-
Layers-New Raster Layer
Add your text and copyrights
Layers-Merge~Merge All (Flatten)
Export as Jpeg Optimizer and save to your designated folder.


Thank you for doing my Tutorial and a special Thank you for testing my Tuts to-
Janis
MaryD
Sammy


Monday, May 14, 2018

FAIRY MAGIC


Materials Here


Let's get started-
Step 1- New image-700x700
Foreground color- #9cb3d0
Background Color- #2d4d96
Floodfill with foreground gradient using these settings-
100, 0, Linear, Invert=UN-checked

Step 2- Open Pond.png
Edit/Copy, close Original
On the working canvas
New Raster Layer
Selections/Select All
Edit/Paste/Paste Into Selection
Blend Mode=Luminance (Legacy)
Selections/Select None

Step 3-Open Frame1
Edit/Copy, Close Original
Edit/Paste/Paste As New Layer
Image/Resize at 85%, Resample Using-Smart Size
All Layers UN-checked
Effects/3D Effects/Drop Shadow with the settings below-
V & H= 4,  opacity- 100, Blur= 5, Black
Use these settings thru-out the Tut, unless otherwise stated.

Step 4- Open Snail
Edit/Copy, Close Original
Edit/Paste/Paste As New Layer
Resize by 85%, Resample Using-Smart Size- two times (twice)
Move the snail to the bottom right of canvas
Effects/3D Effects/Drop Shadow


Step 5- Open Flower 2
Edit/Copy, Close Original
Edit/Paste/Paste As New Layer
Move the Flower2 to the bottom left of canvas
Effects/3D Effects/Drop Shadow 

Step 6- Open Fairy
Edit/Copy, Close Original
Edit/Paste/Paste As New Layer
Move the fairy to the right side of frame-see my example above
Effects/3D Effects/Drop Shadow 

Step 7- Open Ladybug
Edit/Copy-Close Original
Image/Resize by 75%- Resample Using-Smart Size-All Layers UN-checked
Image/Rotate/Free Rotate-  Left/20
Move to the top Left of frame
Effects/3D Effects/Drop Shadow 
Layers/Merge/Merge All Flatten

Step 8-
Change the gradient setting back to your foreground color
Image/ Add Borders
Symetric Checked
5 pixels-Background Color (#2d4d96)
5 pixels-Foreground Color (#9cb3d0)
5 pixels-Background Color (#2d4d96)


Step 9- Layers/Promote Background Layer
Layers/Duplicate
Image/Resize by 85%- Resample Using= Smart Size
All Layers UN-checked 
Effects/3D Effects/Drop Shadow
Repeat the Drop Shadow, but change the V & H to -4 (minus)


Step 10 -Open Butterfly
Edit/Copy-Close original
Edit/Paste/Paste as New Layer
Image/Resize by 40%- Resample Using-Smart Size-
All Layers UN-checked
Effects/3D Effects/Drop Shadow-changing the V & H back to 4
Move to the top right corner of canvas
See my example above

Step 11- Layers/Duplicate
Image/Mirror
Layers/Merge All Flatten
Image/Resize/75%-Resample Using-Smart Size-
All Layers-Checked
Adjust/Sharpness/Unsharp Mask-
5, 10, 5

Step 12- Layers/New Raster Layer
Add your text and copyrights
Layers/Merge/Merge All Flatten

Export as Jpeg Optimizer and save to your designated Folder

Thank you to my Testers-
Janis
MaryD
Sammy


Sunday, May 13, 2018

LET'S MAKE HONEY


Supplies-
Tubes-
Template-
SUPPLIES HERE

No outside Filters used

This Tutorial assumes you have a working Knowledge of PSP


Open PSP
Open Tubes-Minimize all for now
Set Foreground Color-I used #f0e482
Set Background Color-I used #e57a4f

Let's get started-

Step 1- Open template 32 by AquaRebel315
Windows/Duplicate. 
Close the Original
On the duplicated image, highlight the top Layer (© Credits)
Delete the top layer

Step 2- X out the background layer
You can open it later if you choose, but I prefer a transparent background.
Highlight Raster 1
Selections/Select All
Selections/Float
Selections/Defloat


Step 3-Floodfill with the background color (#e57a4f)
Selections/Select None
Effects/3d Effects/Drop Shadow -
V & H-0, 100, 5 Black

Step 4-Highlight Copy of Raster 1
Click inside the frame with the Magic Wand Tool
Tolerence= 0 Feather= 0
Open Paper 1
Edit/Copy
Edit/Paste/Paste Into Selection
Selection/Select None

Step 5- Highlight Raster 2 Layer (The circle of dots)
Adjust/Color Balance/Manual Color Correction with these settings-
Source= #c0c0c0 Target= #f0e482 (or your prefered 3rd color choice)

Step 6- Highlight Raster 3
Adjust/Color Balance/Manual Color Correction- (settings same as in Step 5)
Selections/Select All
Selections/Float
Selections/Defloat
Selections/Modify/Contract by 5

Step 7-Open Paper 7
Edit/Copy/
Edit/Paste Into Selection
Selections/Select None


Step 8- Highlight Raster 4-
Selections/Select All
Selections/Float
Selections/Defloat
Flood fill with your foreground color (#f0e482)
Keep Selected

Step 9- Effects/#D Effects.Drop Shadow-changing the settings to-
2,2,100,5, Black
Selections/Select None
Open Honey Bee 3


Step 10- Edit/Copy, Close original
Back on your working canvas
Edit/Paste/Paste as new Layer
Image/Resize/50%, All Layers UNchecked
With The Move Tool, position Honey Bee 3 to the top right of the canvas,
see my example above
Effects/3D Effects/Drop Shadow-
Same settings used in Step 9

Step 11- Open Honey Bee4
Edit/Copy, Close original
Edit/Paste/Paste As New Layer
Image/Resize by 50%, two times

Step 12- With the Move Tool, position the Honey Bee4 towards the bottom right-
See my example above
Effects/3D Effects/Drop Shadow, same settings used in Step 9
Open Honey Bee8

Step 13-  Edit/Copy, Close Original
Edit/Paste/Paste As New Layer
Image/Resize by 50%-All Layers UNchecked
With the Move Tool position Honey Bee8 to the top left,
Effects/3D Effects/ Drop Shadow
Same settings as in Step 9

Step 14- Open Honey Bee20
Edit/Copy/, Close Original
Edit/Paste/Paste As New Layer
Image/Resize by 50%-All Layers UNchecked-2 times (twice)
Effects/3D Effects/ Drop Shadow
Same settings as in Step 9
Postion the Honey Bee20 near the top left side of your image
See my example above

Step 15- Open Honey Bee 22
Edit/Copy-Close Original
Edit/Paste As New Layer
Image/Resize by 50%-All Layers-UNchecked
Image/Resize by 75%-All Layers UNchecked
Effects/3D Effects/Drop SHadow-same settings as in Step 9.

Step 16-the Bottom Background Layer you can delete now (Or leave, your choice)
Layers/Merge/Merge All Visible 
(If you left the background layer-Layers/Merge/Merge All Flatten and add a border)

Step 17- Layers/New Raster Layer
Add your text and copyrights
Layers/Merge/Merge Visible

Step 18- Export as PNG optimizer/to your designated folder
Thank you for doing my Tutorial, and 
a special thanks to those that tested my Tut...
Janis
MaryD
Sammy