Tutorial was created in JASC PSP9, but can work in any version, with a few minor changes.
Supplies-you can get here-
Plugins Used-
Filters Unlimited2-Special Effects-Aged Film
Foreground Color-I used #e5e8b9
Background color- I used #b2684d
------------------------------------------------
Step 1- Open the tubes in PSP, minimize for now.
File/New, 700 x 700, Transparent Checked
Change Foreground color to Gradient..Settings as shown below--
45, 5, Linear, Invert-UNchecked
Step 2- Floodfill with your Gradient
Change your foreground back to color (#e5e8b9)
Layers/New Raster Layer
Floodfill with the foreground color
Step 3- Maximize tw_001
Edit/Copy
Back on your working canvas
Selections/Select All
Edit/Paste/Paste Into Selection
Selections/Select None
Set the Blend Mode to Luminance (Legacy)
Step 4-
Filters Unlimited2/Special Effects1/Aged Film with the settings shown below-
21, 36, 175
In the Layers palette lower the Opacity to 75
Step 5- Open tw_83
Edit/Copy, Close Original
Edit/Paste/Paste As New Layer
Image/Resize//75, Resample=Smart Size
Move to the bottom right side of canvas.
See my example above.
Step 6- Effects/3D Effects/Drop Shadow using the settings shown below-
4, 4, 50, 5, Black
Step 7- Open TW_oo5_38
Edit/Copy, Close Original
Edit/Paste/Paste As New Layer
Image/Resize/75%, two times Resample-Smart Size
Move to bottom left of canvas
Step8- Apply Drop Shadow-same settings as in Step 6
Layers/Merge/Merge All Flatten
Filter's Unlimited 2/Special Effects1/Aged Film-same settings as used in Step 4.
Step 9-Image/Add Borders/10, backgound color (#b2684d)
Image/Add Border/10, foreground color (#e5e8b9)
Image/Add Borders/25, backgound color (#b2684d)
With the Magic Wand click on the 25 border-using the settings shown below--
Add (Shift), RGB Value, Tolerance & Feather-0,
Continguous And Anti-Alias= Both Checked, Outside
Step 10- Effects/Reflection Effects/Kaleidoscope/, using the settings shown below
0, 0, 0, 0, Reflect, 8, 0, 0
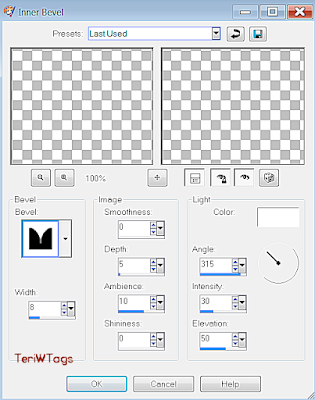
Step 11- Effects/3D Effects/Inner Bevel, using the settings as shown below-
8, 8, 0, 5, 10, 0, White, 315, 30, 50
Selections/Select None
Step 12- Layers/Duplicate
Image/Resize/85%,
Effects/3D Effects/Drop Shadow, using the same settings as in Step 6.
Layers/Merge/Merge All Flatten
Adjust/Sharpness/Unsharp Mask, with these settings-
5, 10, 5
Step 13- Image/Resize/65%, All Layers=Checked
Layer/New Raster Layer
Add your copyrights and text
Layers/Merge/Merge All Flatten
Export using JPEG Optimizer and save to your designated folder.
Thank you for doing my Tutorial and a Special Thank you for Testing it to-
Sammy
Jani
MaryD
Janis
Another Example by Sammy
And By Elaine


