Translate

Monday, July 23, 2018

FRIENDS


This Tutorial was created in Jasc PSP9 but can be done in any version.

Supplies Needed
CGS_Girls (or tube of your choice)
selection_Friends (put in your PSP Selections folder)
Supplies here-
Box
or
4Shared

Plugins Used-
VanDerLee~Unplugged X

------------------------------------
Foreground color-#ddbc88
Background color-#822807


Step 1-
File~New~650 X 400, Transparent

Change forground color to Gradient
Linear~45~5~

Floodfill with Gradient


Step 2-
Layers~New Raster Layer
VanDerLee~Unplugged X~45*Rectangle, Foreground color (#ddbc88)

Selections~Select All
Selections~Float
Selections~Defloat
Selections~Modify~Contract by 5

Step 3-
Layers_New Raster Layer
Floodfill with the foreground Gradient
Do not Deselect

Step 4-
Open your Tube-CGS~PMGirls
Edit~Copy
Go back to your working canvas
Edit~Paste~Paste Into Selection
Selections~Select None
Layers~Merge~Merge Down


Step 5-
Layers~Duplicate~two times
Highlight Copy of Raster 2
X out the top Layer-Copy (2) of Raster 2
Image~Resize by 85%, All Layers Unchecked
With the Move Tool, position to the right of your first 
rectangle

Step 6-
Open and Highlight the top Layer-Copy (2) of Raster 2
Image~Resize by 75%, All Layers Unchecked
With the Move Tool, position to the left side of the canvas
Layers~Merge~Merge Down

Step 7-
Effects~3D Effects~Drop Shadow using these settings-
2, 2, 100, 5, black
Repeat Drop Shadow but change V & H to -2 (minus)
In the materials palette lower the opacity to 80%
Layers~Merge~Merge All (Flatten)

Step 8-
Open your tube again
Edit~Copy
Edit~Paste~Paste As New Layer
Image~Resize 75%, All Layers Unchecked

Step 9-
Effects~Drop Shadow-same as in Step 7
Repeat Drop Shadow~Change V & H to 2
Layers~Merge~Merge All Flatten
Image~Add Borders~2, Background color
Edit/Copy, Minimize

Step 10-
File~New~650 X 400
Change your Foreground Gradient settings to-
Linear, 150, 25
Floodfill this canvas with the Gradient

Step 11-
Edit~Paste~Paste As New Layer
Image~Resize by 75%, All Layers Unchecked
Effects~3D Effects~Inner Bevel-using these settings-
2, 3, 0, 6, 6, 0, white, 315, 50, 30

Layers~Merge~Merge All (Flatten)

Step 12-
Layers~New Raster Layer
Add your copyrights and text to this layer
Layers~Convert To Raster Layer
Layers/Merge~Merge All (Flatten)

Step 13-
Image~Add Borders~2, Background color
Layer~New Raster Layer
Selections~Load/Save Selection~Load Selection From Disk~selection_Friends
Do Not Deselect

Step 14-
Layers~Duplicate, two times
X-out the top two Layers (copys)
Highlight Raster 1
Floodfill the squares with forground color

Step 15-
X-out Raster 1, open and Highlight Copy of Raster 1
Selections~Modify~Contract by 2
Floodfill this layer with the Background color
Do Not Deslect
X out this layer, Open & Highlight the top Layer-Copy (2) of Raster

Step 16-
Selections~Modify-Contract by 2
Floodfill the squares with the Foreground Gradient as in Step 1
Selections~Select None

Step 17-
X-0ut this layer, Open Raster 1 layer, 
Layers~Merge~Merge Down
Highlight Bottom Layer (Background)
Image~Resize by 85%, All Layers Checked

Now we're going to animate it.

Step 18-
Edit~Copy Merged
Open Animation Shop
Paste~Paste As New Animation

Step 19-
Go back to PSP and X-out Raster 1
Open Copy of Raster 1
Keep the background layer Highlighted

Step 20-
Edit~Copy Merged
Go back to Animation Shop
Edit~Paste~After Current Frame

Step 21-
Go back to PSP and X-out this layer (copy of Raster 1)
Open Copy (2) of Raster 1 
Keep the background layer Highlighted
Edit~Copy Merged

Step 22-
Go back to Animation Shop
Edit~Paste~After Current Frame
Animation~Frame Properties~20
View~Animation
If your happy with the results Save as GIF to your designated folder

Thank you for doing my Tutorial.

And a special thank you to the testers-
MaryD
Sammy
Jani
Janis


Friday, July 20, 2018

RESTING WITH FRIENDS


Supplies Needed-
Main Tube
(Mine is a PTU from picsfordesign.com)
2 Masks are included in the supplies here-
4Shared
or
DropBox
------------------
No Outside Plugins Used-
------------------
Open all the tubes in PSP, duplicate and minimize, Close Originals
Pick two colors that blend nicely with your main tube
Forgeround color-Light
Background Color-Dark
-------------------

Change your forground color to Gradient using these settings-
Linear, 90, 0, Invert Checked
--------------------

Step 1-
New-700x700
Floodfill with foreground gradient

Layers~New Raster Layer
Foodfill with background color

Step 2-
Layer-New Mask Layer~From Image~
32_sharev_msk
Invert Checked
Layers~Merge Group

Step 3-
Layers~New Raster Layer
Change Gradient back to Foreground color
Floodfill with your foreground color
Layers~New Mask Layer~From Image
145, Invert checked

Step 4-
Layers~Merge~Merge Group
In the materials palette, lower Opacity to 50

Layers~Merge~Merge~Merge All (Flatten)

Step 5-
Effects~Image Effects~Seamless Tiling
Corner, Bidirectional, 0, 0, 50, Linear

Layers~Promote Background Layer
Image Add Border~5, background color

Layers~Duplicate X2 (two times)


Step 6-
Highlight On the middle layer- Copy of Raster 1 (X out the top layer)
Image~Resize~85%
Image~Rotate~Free Rotate~
Right, 45 degrees
Effects~3D Effects~Inner Bevel
2, 3, 0, 6, 6, 0, 315, 50, 30, white

Step7-
Open and Highlight your top layer-Copy (2) Raster 1
Image~Resize~75%, All Layers UNchecked
Effects~3D Effects~Inner Bevel, same as in Step 6
2, 3, 0, 6, 6, 0, 315, 50, 30, white

Step 8-
Maximize your tube
Edit~Copy
Edit~Paste~Paste As New Layer
Image~Resize to the appropiate size for your tag
I positoned mine to the bottom center (See my tag above for an example)
Effects~3D Effects~Drop Shadow
2, 2, 100, 2, Black

Step 9-

Layers~Merge~Merge All (Flatten)
Image~Add Borders~5-Foreground color
Image~Add Borders~45-Background color

Step 10-

Using the Magic Wand tool, click on the 45 border


Add~RGB Value~20, Contiguous Checked, 0, Anti-alias Checked, Outside

Step 11-
Layers~New Raster Layer
Floodfill  with Foreground color
Effects~Reflection Effects~Pattern-using the settings below-


96, 91, 103, -21(minus), 5, 10, 0, 0

Step 12- 
Effects~3D Effects~Outer Bevel-


2, 5, 5, 10, 5, 5, white, 315, 50,30
Selections~Select None
Layers~Merge~Merge All (Flatten)

Step 13-

Image~Add Borders~5, Background color
Image Resize by 65%
Adjust~Sharpness~Unsharp Mask
10, 15, 10

Step 14-

Layers~New Raster Layer
Add your copyrights and Text
Layers~Merge~Merge All (Flatten)
Save as JPG to your designated Folder


Thank you for doing my Tutorial.


And a Special Thank you to my Testers-

Jani
MaryD
Luda
Sammy


Saturday, July 14, 2018

MY SWEET DRAGON


Created in Jasc PSP9, but can be done in any verion with a few minor adjustments.

Supplies Needed-
A Tube
(mine is a PTU tube from picsfordesign.com and you need a license to use it.)

Plugins Used-
I.C.Net Software~Filters Unlimited 2~Noise Filter~
Effects~VanderLee~Unplugged X~Lasarrays

Open your tube
Duplicate & Close Original
Pick a light color and a dark color from your tube

Step 1-
File~New, 700 x 700
Change foreground color to Gradient
30, 2, Rectangular, 50, 50, 50, 50

Floodfill the canvas with your gradient
I.C.Net Software~Filters Unlimited 2~Noise Filter~X-Noise
78

Step 2-
Effects~VanderLee~Unplugged X~Lasarrays

0, 25, 0, Lasarrays

Step 3-
Effects~Image Effects~Seamless Tiling
Corner, Bidirectional, 0, 0, 50, Linear Checked

Selections~Select All
Selections~Modify~Contract by 20

Step 4-
Selections~Invert
Layers~New Raster Layer
Floodfill with the foreground Gradient, same as in Step 1
Selections~Select None

Step 5-
Maximize your Tube
Edit~Copy, Close Original
Edit~Paste~Paste As New Layer
Effects~3D Effects~Drop Shadow
3, 3, 100, 5, Black
Repeat Drop Shadow, changing the V & H to -3 (minus)


Step 6-
Layers~Merge~Merge All (Flatten)
Image~Add Borders ~4, foreground color

Step 7-
Image~Add Borders~25, foreground color
With the Magic Wand Tool-
Add (Shift)~RGB Value, Contiguous and Ant-alias both Checked

Select inside the 25 border

Step 8-
Effects~Distortion Effects~Curlycues
10, 10, Symmetric Checked, 100, 100
Selections~Select None

Step 9-
Image~Add Border 4, Background color
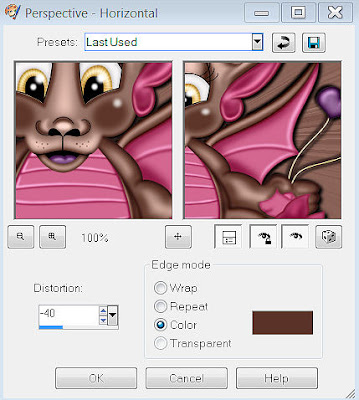
Effects~Geometric Effects~Perspective Horizontal~


-40 (minus), Color, background color

With the Magic Wand, same settings as in Step 7
Click inside the top solid background space
(Top and Bottom solid background should have marching ants around it.)
Step 10-
Effects~VanderLee~Unplugged X~Laserrays
(watch your numbers closely)
Normal, 0, 55, 357, Background
Selection~Select None


Step 11-
Image~Add Borders 4, background color (same as in step 4)
Image~Add Borders 4, foreground color (same as in Step 6)
Image~Add Borders 4, background color (As above)


Step 12-
Layers~New Raster Layer
Add your copyrights and text
Layers~Merge~Merge All (Flatten)

Save As jpg to your designated folder.


And a special Thank you to those that tested my Tut:
Sharon
Ernie
Marianne
Jani 
Sammy
MaryD


Thursday, July 12, 2018

DOUBLE YOUR TROUBLE


Author: TeriWTags (aka A Scrappers Dream)

Any resemblence to any other Tutorial is purely coincidental. 

SUPPLIES NEEDED-
1 Tube
(The PTU tube I used is by Jamie Kidd and you need a license to use it. 
I got the tube from C.I.L.M but they are closed now. He now sells his tubes here- http://www.cdoestore.com/ )

No outside Plugins used
--------------------------------------------------
Step #1- 

File/New, 700 by 400, Transparent 

Using the Floodfill Tool, fill this layer with your foreground color 

I used #592020 

Adjust/Add Remove Noise/Add Noise, using the settings below: 

Gaussian, Noise= 50, Monochrome Checked
STEP #2- 
Layers/New Raster Layer 
Selections/Select All 
Open the tube you are using, I'm using a tube by Jamie Kidd 
Edit/Copy, Minimize Original 

STEP #3- 
Edit/Paste/Paste Into Selection 
Selections/Selection None 
In the Layers Palette, lower the Opacity to 70 and Luminence (Legacy) 
Effects/Image Effects/Seamless Tiling, using the settings below: 

Corner, Bidirectional, H & V=0, Transition= 50, Linear


STEP #4- 

Layers/Duplicate 

Effects/Geometric Effects/Perspective vertical, using the settings below: 


45, Transparent


STEP #5- 


Image/Resize by 85%, Resize All Layers Unchecked 


Effects/3D Effects/Drop Shadow, using the settings below: 


V & H=2, Opacity=85, Blur=2, Color=Black

STEP #6- 

Repeat Drop Shadow, but change the V & H to minus 2 (-2) 

Layers/Duplicate 

Image/Resize by 85%, Resize All Layers Unchecked 

Image/Flip 

Layers/Merge Visible 

STEP # 7- 
Layers/New Raster Layer 
using the Selection Tool, and seeing my tag above for an example-draw a rounded 
rectangle, using the settings below-

Rounded Rectangle, Add, 0, Anti-alias Checked


STEP #8- 

Using the Floodfill tool, fill this layer with your background color, 

I used color #f2c4a7 

Effects/Texture Effects/Blinds, with the setttings below: 


5, 50. Color=#f2c4a7, Horizontal and Light from left top, both Checked


STEP #9- 
Selections/Select None 
Effects/3D Effects/ Drop Shadow, using the same settings as in Steps #6 & 7 above 
In the Layer Palette, Lower the Opacity to 55 

STEP #10- 
Layers/Duplicate 
On the duplicate layer 
Image/Flip 
Image/Resize by 85%, Resize All layers Unchecked 
Layers/Merge/Merge All Flatten 

STEP #11- 
Edit/Paste/Paste As New layer, it should still be your copied in Step #2 
With the Move Tool, positon to the left side of the canvas 
Effects/3D Effects, using the same settings in Steps #6 & 7 above 
Layers/Duplicate 
Image/Mirror 

STEP #12- 
Layers/Merge/Merge All Flatten 
Image/Add Borders/3, Synmetric Checked-your light background color 
Image/Add Borders/3, Synmetric Checked-your dark foreground color 
Image/Add Borders/3, Synmetric Checked-your light background color 

STEP #13- 
Selections/Select All 
Selections/Contract/9 
Effects/3d Effects/Drop Shadow, using the same settings in Steps #6 & 7 above 
Selections/Select None 

STEP #14- 
Image/Add Borders/25, White 
With the Magic Wand, Select Inside the border, using the settings below: 


Add, RGB Value, Tolerence=20, Contiguous And Anti-Alis both Checked, Outside


Step #15- 
Using the FloodfillTool, fill this area with your dark foreground color 
Edit/Paste/Paste Into Selection, your tube we copied earlier should still be loaded, 
If not Edit/Copy, again. 
Effects/Reflection Effects/Pattern, using the settings below: 


0,0,90,0,3, 3,0, 0

STEP #16- 


Effects/3D Effects/Inner Bevel, using the settings below: 

Bevel=7, 5, 5, 5, 5, 5, Color=White, 315, 50,30

STEP #17- 
Selections/Select None 
Image/Resize by 85%, Resize All layers Checked 
Adjust/Sharpness/Unsharp Mask with these settings-
10, 15, 10

Step #18-
Layers/New Raster Layer
Using the Text Tool, add the copyrights and your text 
Layers/Merge/Merge All (Flatten)

File/Export/JPEG Optimizer/OK 
Save to your designated folder. 

Thank you for doing my tutorial. 

A special Thank You to my Tut Testers: 
Sue 
MaryD 
Kathryn 
Bobbie